Hello Friends, Justtrick4you provide a Tricks for you. How to create wifi hotspot in Window 7 and window 8 ? A WiFi Hotspot is a Wireless hub which offers a network access to various devices over a wireless medium using routers. It requires a particular software which gives the ability to host a Hotspot in your computer. In order to reduce the difficulty, it’s better to establish a WiFi Hotspot using Command Prompt.
Now a Days, the utilization of the internet is increasing day by day. At the same time, sharing of resources on the Internet has been triggered between Wireless Routers or Mobile WiFi Hotspots. If you are away from your home network and do not access to your internet connection, you will probably require some of your friends or colleagues internet to share their network access and connect through a common gateway. And that’s what we call a “WiFi Hotspot“.
Read the below Steps and start your own wifi hotspot in your Laptop.
Step 1 : Open run (windows key+R), type ncpa.cpl

Step 2 : A new window is in front of you. There select wireless Network adapter and sharing center and select properties.
.jpg)
Step 3 : In wifi properties Select share, followed by Allow Others Network users to connect.
.jpg)
Note : Never Tick 2nd Option.
Step 4 : Open Command Promote As administrative.
.jpg)
Step 5 : You need to copy and paste below command in command prompt without double quote.
"netsh wlan set hostednetwork mode=allow ssid=justtrick4you key=password "
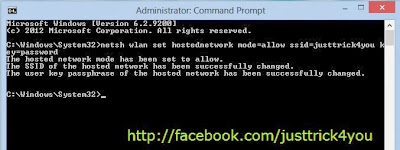
You will see SSid which is actually your network name, which we are going to create.
Step 6 : Now you need to start the network By using below command.
"netsh wlan start hostednetwork". Everything is done. Now you can observe your laptop is working like a router.
Note : To check How many Devices Are connected to your router you need to enter below command in command promote.
Step 7 : "netsh wlan show hostednetwork". This command is used to show how many Device are connected with your router.
Step 8 : If you can Terminated your Hotspot then use this command.
"netsh wlan stop hostednetwork".
Note : Do you think typing a command for starting/Stopping the WiFi Hotspot is a time dependent ? OK, I’m going to show you one trick so that you can Start/Stop your WiFi Hotspot in a single click.
Step 9 : Desktop ➟ Right click ➟ New ➟ Shortcut.
.png)
Step 10 : Type the command without quote "C:\Windows\System32\netsh.exe wlan start hostednetwork" on the shortcut and click on Next.
.png)
Step 11 : Rename it as “Start WiFi” and click finish.
.png)
Step 12 : Type the command without quote "C:\Windows\System32\netsh.exe wlan stop hostednetwork" on the Shortcut and Rename it as "Stop Wi-Fi" and finish.

You are done with creating your WiFi Hotspot. You can now use the new shortcuts whenever you wish to use your Wifi Hotspot.
Thanks for Visit,
Owner of JustTrick4You.
Vansiwala Shahabuddin
Now a Days, the utilization of the internet is increasing day by day. At the same time, sharing of resources on the Internet has been triggered between Wireless Routers or Mobile WiFi Hotspots. If you are away from your home network and do not access to your internet connection, you will probably require some of your friends or colleagues internet to share their network access and connect through a common gateway. And that’s what we call a “WiFi Hotspot“.
Read the below Steps and start your own wifi hotspot in your Laptop.
Step 1 : Open run (windows key+R), type ncpa.cpl

Step 2 : A new window is in front of you. There select wireless Network adapter and sharing center and select properties.
.jpg)
Step 3 : In wifi properties Select share, followed by Allow Others Network users to connect.
.jpg)
Note : Never Tick 2nd Option.
Step 4 : Open Command Promote As administrative.
.jpg)
Step 5 : You need to copy and paste below command in command prompt without double quote.
"netsh wlan set hostednetwork mode=allow ssid=justtrick4you key=password "

You will see SSid which is actually your network name, which we are going to create.
Start Hotspot
Step 6 : Now you need to start the network By using below command.
"netsh wlan start hostednetwork". Everything is done. Now you can observe your laptop is working like a router.
Note : To check How many Devices Are connected to your router you need to enter below command in command promote.
Step 7 : "netsh wlan show hostednetwork". This command is used to show how many Device are connected with your router.
Stop Hotspot
Step 8 : If you can Terminated your Hotspot then use this command.
"netsh wlan stop hostednetwork".
Note : Do you think typing a command for starting/Stopping the WiFi Hotspot is a time dependent ? OK, I’m going to show you one trick so that you can Start/Stop your WiFi Hotspot in a single click.
Step 9 : Desktop ➟ Right click ➟ New ➟ Shortcut.
.png)
Step 10 : Type the command without quote "C:\Windows\System32\netsh.exe wlan start hostednetwork" on the shortcut and click on Next.
.png)
Step 11 : Rename it as “Start WiFi” and click finish.
.png)
Step 12 : Type the command without quote "C:\Windows\System32\netsh.exe wlan stop hostednetwork" on the Shortcut and Rename it as "Stop Wi-Fi" and finish.

You are done with creating your WiFi Hotspot. You can now use the new shortcuts whenever you wish to use your Wifi Hotspot.
Thanks for Visit,
Owner of JustTrick4You.
Vansiwala Shahabuddin


Can this be used as if I am connected to wi-fi and want to share the internet through wi-fi.
ReplyDelete